Learn how to dev: Obby Devlog

Overview

In this thread I will be showing you the basics of game development for beginners. This will include aspects such as building, scripting, and work flow management. It is my intent to get more people into game development with this thread, and I hope you enjoy the ride.

The steps required to complete this project will be given in the replies to this thread. Feel free to ask questions and show the progress that you have made!

Step 0: Downloading Roblox Studio

We will be completing this project using Roblox Studio, so you will need to download it before being able to continue. It should be fairly simple to perform.

Firstly, you will need to go to https://create.roblox.com/ and then click “Download Studio”, which should be on the right hand side as shown.

This will download Roblox Studio. You will then need to sign in, and after doing so will be greeted with this screen:

This is where you can create new game projects. The objects listed near the bottom are templates projects that may help you jumpstart any future project.

I would advise choosing either Baseplate or Classic Baseplate, as they have the least amount of extra parts. You could also do Obby, however that does most of your job for you, so I’d advise against it if you’d like to legitimately learn.


Great job! You have now created your first project.
In order to save it, you will need to go up to the top left, click file, and then click save to file as.
image

Links to Steps

3 Likes

If you have any questions please ask!!

my baseplate looks a bit different am i doing something wrong :(

Nope it still looks usable :+1:
(as long as it doesn’t have roblox terrain it should be perfectly fine to use)

Step 1: The Explorer and Cleaning the Slate

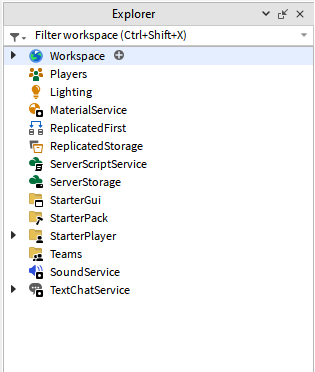
Now that you have set up a project, it is time to start familiarizing yourself with your work environment. The first thing you should do is to look for the Explorer tab. It should be on the side of your screen, and look something like this:
image

If you can’t find the tab, it may have been closed. To reopen it, you will need to click on the View tab on the top, and then press the Explorer button underneath File:
image

Lets go back up to the Explorer tab. Currently it is showing us the Services used in the game. We will get to familiarize with quite a few of them in later projects, however the only Service we will need to work with on this project is the Workspace.

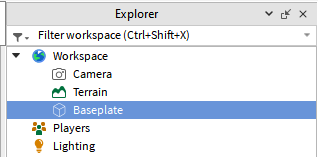
The Workspace contains what is currently loaded on screen, which includes Characters, Models, Meshes, Parts, and so on. You can see what is contained in the service by clicking the triangle next to it.
image

Now I’d like you to destroy the Baseplate, so that we can have an easier time building in the next step. You can do this by selecting the Baseplate under the Workspace, and then pressing the Delete key.


Now that the project is cleaned up, we will be able to easily build onto it in the next step! yippee

1 Like

oh ill also add that you should disable view selector (i just found that out thanks to vetex :sob: )
image
image

noo not jeremy :sob:

We gaming, waiting for step 2 >:D
image

1 Like

whats exactly wrong with it?

ruins screenshots and is pointless

fair enough ig

Step 2: Properties and the Basics of Building

Now that the workspace has been cleared, it is time to start building the obby!

Firstly we will want to add in a Spawn. This is where the player will be loaded in when the game starts, and will also stop them from constantly falling into the void. To add it in, click on Model up top and then press Spawn to the right of the dashboard.

This creates a Spawn object inside the Workspace, and hopefully you will be able to see it like so:

More often than not, this Spawn is not centered in the world. To fix that, we will need to look over at the Properties tab. Like the Explorer tab, it should be located on the side of your screen, and look something like this:


Note: you will need to have selected an object for its properties to appear!! Otherwise, the Properties tab will appear blank.

Now that we know where the Properties tab is, we can manipulate it to get a desired result. In this case, go under Transform and change the Position of the Spawn to be (0, 0, 0) (which means 0 in the X direction, 0 in the Y direction,0 in the Z direction)
This should center the spawn to the Origin of your Workspace.

Now it is time to start building! You can create objects for your player to jump to by pressing Part (under the Model section).


This creates a Part object under the Workspace, which you can move around using the Select and Move tools located to the left of the dashboard.

382051f702d7f02fcfaceffc2ebc5418884eaf03_2_599x500
image

There are a couple properties we need to change about this part. For starters, it’s way too small. Go over to the Properties tab and change the part’s Size to be larger, such as (6,1,6) for example.
Next, we need to Anchor the part, which will stop it from falling into the void when we start up the game. Go over to where it says Anchored and click the check mark box beside it.

Great job! Now we have an object we can jump to for our obby. If you want to make more of the same part, you can do Ctrl D to duplicate the part, which you can then reposition using the Move tool.

That concludes this step, next up we will be learning some scripting by making a kill-part :)

1 Like

Lets goooooo
Part 2 baby!
image

2 Likes